Tutorials
How to Trigger a Retool Workflow from an App
If you've been trying to figure out how to trigger a Retool Workflow from an app, you're not alone. The setup is straightforward once you know the steps, but the Retool docs leave a few gaps that have tripped up plenty of developers. This guide covers the full process — from configuring the Webhook trigger to passing data into your workflow and deciding whether to use a REST API query or a native Workflow resource.
Step-by-Step: Triggering a Retool Workflow via Webhook
The core mechanism is simple: set your Workflow to listen for an incoming HTTP request, then fire that request from your Retool app using a REST API query.
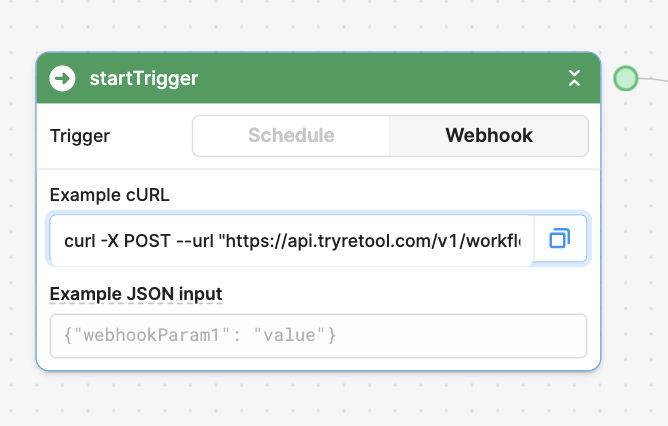
- Step 1: Open your Workflow and set the Start Trigger to
Webhook. This will generate a unique webhook URL shown in theExample cURLfield of the trigger block. - Step 2: Copy the URL from the
Example cURLfield. Only copy the URL itself — starting fromhttps://to the end of the quoted string. Do not paste the entirecurl -X POST ...command into your base URL field. That's the most common mistake people make and it will silently fail. - Step 3: In your Retool app, create a new REST API query. Set the method to
POSTand paste the webhook URL as the base URL. - Step 4: Deploy your Workflow. This is critical — if your Workflow is not deployed, your app will not be able to reach it and will return a false success flag with no actual execution. Many hours have been lost to this one.
- Step 5: Run the REST API query from your app wherever you need it. To chain it after another query completes, add it as a Success Handler on that query.
How to Pass Data from Your App into the Workflow
The Webhook trigger in Retool Workflows accepts a JSON object in the request body. This means you can pass any data from your app — including current_user — directly into the workflow at trigger time.
In your REST API query body, send a JSON payload like this:
{ "triggered_by": "{{ current_user.email }}", "record_id": "{{ table1.selectedRow.id }}" }
Inside your Workflow, you can then reference that data anywhere using {{ startTrigger.data.triggered_by }} or {{ startTrigger.data.record_id }}. This makes it easy to build conditional logic based on who triggered the workflow or what record they were acting on.
Important note on test data: If you populate the Example JSON Values field in the startTrigger block, Retool will use that test data as a fallback. In some cases, this can cause your workflow to silently ignore the actual payload being sent and use the test values instead — making your logs look correct when the workflow is actually running on stale data. If you're seeing unexpected values in downstream blocks, clear the example JSON or make sure it exactly matches your real payload structure.
Should You Use a REST API Query or the Workflow Resource Type?
Retool gives you two ways to call a workflow from an app: a raw REST API query hitting the webhook URL, or using the built-in Workflow resource type in a query. Here's when to use each:
- Use the Workflow resource type when you want the simplest, most maintainable setup. Retool handles URL validation, authentication, request formatting, and response parsing automatically. It's the right default for most internal tools.
- Use a REST API query or
fetchwhen you need fine-grained control — for example, if you're sending a specific JSON structure to a private webhook endpoint, need to avoid extra auto-generated headers, or want to optimize for latency in a performance-sensitive workflow. You can trigger a workflow directly with:
await fetch('https://api.retool.com/v1/workflows/<workflow_id>/startTrigger?workflowApiKey=<api_key>', { method: 'POST', body: JSON.stringify({ workflowParam1: 'value' }), headers: { 'Content-Type': 'application/json' } });
In practice, both approaches produce the same result. The Workflow resource adds some processing overhead for validation and response handling, but for nearly all internal tool use cases that overhead is negligible. The fetch approach gives you more control but requires you to manage authentication and error handling yourself.
Getting Data Back from the Workflow to Your App
If you need the workflow to return data to the app that triggered it, add a Webhook Response block at the end of your workflow. This block lets you define the JSON response body that gets sent back to the caller. Your REST API query in the app will receive this response, and you can use it in subsequent logic — for example, displaying a confirmation message or updating a component's state.
Common Mistakes to Avoid
- Pasting the full
curlcommand into the base URL field instead of just thehttps://URL. - Forgetting to Deploy the workflow before testing from the app.
- Leaving example JSON in
startTriggerthat doesn't match your real payload, causing silent data mismatches in downstream blocks. - Not setting
Content-Type: application/jsonwhen using a rawfetchcall, which can cause the webhook to fail to parse the body.
Once you have this wired up, triggering a Retool Workflow from an app becomes one of the most powerful patterns in your internal tooling stack — letting you offload async work, schedule follow-up actions, and build event-driven logic without leaving the Retool ecosystem.
Ready to build?
We scope, design, and ship your Retool app — fast.